Though many of them would deny it, the Japanese are notorious sweet-eaters who indulge in a multitude of cakes, most often during teatime. This penchant for snacking dates back to the early Edo period (1603-1867), when eating two large meals a day was the norm – repasts punctuated by endless sweets and cups of green tea.

Two distinct categories of sweets in Japan
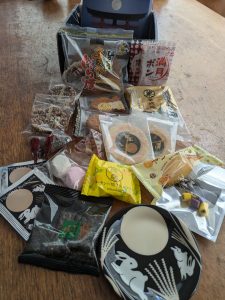
There are two distinct categories of sweets in Japan: wagashi, traditional handmade Japanese confections that are usually steamed or uncooked, and yogashi, or Western-style confections.
Traditional Wagashi
Wagashi have historically deep-rooted celebratory and often seasonal connotations, typified by the use of bird and flower names as well as other natural themes, such as uguisumochi (nightingale mochi [pounded rice] cake), sakuramochi (cherry mochi cake), noshiume (pressed plum cake); and rakugan (“falling geese” cake). The poetic nature of these appellations appealed greatly to monks, samurai, high-class merchants, and others of the intelligentsia. And I will admit, I love Japanese treats (especially wagashi), which I can definitely trace back to my many years of studying the Tea Ceremony when I lived in Japan.
Wagashi uses three primary ingredients
Most wagashi uses three primary ingredients: glutinous rice, sugar, and azuki beans. Glutinous rice was first used in confections back in the Yayoi period (300 B.C.-A.D. 300). Sugar brought in from China during the eighth century, was most popular during the Edo period. Azuki beans, mashed, and sweetened, were introduced from China during the Kamakura period (1185-1333).
Ohagi in the Autumn and Botamochi in the Spring
One of the most popular types of wagashi, called ohagi in the autumn, also referred to as botamochi in the spring (bush clover mochi), depending on season and region, can be traced to the Heian era (794-1185).
Get FREE Japanese Recipes by Email! Sign Up Now!


Ohagi (Botamochi)
Ingredients
- Chunky bean paste mixture*:
- 7 oz. 200g dried azuki beans (soaked in cold water for up to 12 hours prior to cooking, then drained and rinsed)
- 6 cups water
- ¾ cup white sugar, or to taste
- Dash of salt
Rice ball mixture:
- 5 ¾ oz. (170g) mochigome (glutinous rice)
- 5 ¾ oz. (170g) short-grain Japanese rice
- 2 1/3 cups water
- ¼ teaspoon salt
Garnishes:
- ¼ cup toasted black sesame seeds
- 3 tablespoons kinako, (soybean flour mixed with 1 tablespoon white sugar or to taste and a pinch of salt)
Instructions
- Place the beans in a mortar and crush them roughly with a pestle, adding the sugar and the pinch of salt a little at a time. Place the bean mixture in a clean pot and cook over low heat, stirring constantly, for 5 to 10minutes. The mixture will thicken slightly. Pour into a clean bowl and let cool to room temperature.
- Wash and drain the rice. Add the water and salt and cook in an electric rice cooker. (The aim is to make slightly firmer rice, which is why less water than usual is used.) When the rice is cooked, let it rest for up to10 minutes. Sprinkle the salt on top, then semi-mash the rice using a mortarand pestle or a small wooden spoon. Divide into 14 to 16 portions and mold intoballs.
- To assemble the ohagi, first wet your hands with salted water. Shape the still-warm rice balls into ovals, cylinders or rounds. (The shape and size of ohagi, by the way, are up to you.) Cover each ball with a thin film ofchunky bean paste. Roll the balls in the sesame seeds or soybean flour mixture,covering them thoroughly, or leave them as is. You can also make a small holein the bottom of the rice balls, add a small core of red bean paste, and thenproceed with the above method for covering the ohagi. Serve within 12 hours,with plenty of hot green tea as accompaniment.
Notes
Did You Make This Recipe?
If you make this recipe, snap a pic and hashtag it #thanksforthemeal — I would love to see your creations on Instagram and or Facebook, or leave a note in the comments section (see below) if you make this dish!