Tag: daikon

  • A New Year’s Salad: Kohaku Namasu Recipe

    A New Year’s Salad: Kohaku Namasu Recipe

    I have been thinking a lot about end of the year culinary rituals and traditions while writing this blog posting. I keep pondering why when I first experienced Osechi as a young bride (literally only married for 2 weeks) in Tokyo all those years ago, it so captivated me to this day? In a way, it was a culinary bridge to getting to know my new Japanese family through the endless hours of preparing Osechi with my new mother-in-law and sisters-in-law.  I love Osechi as a our special year-end ritual and annual tradition.  I love to celebrate it as a seasonal festive Japanese event.

    A New Year’s Salad: Kohaku Namasu Recipe

    My osechi of today is stream-lined and simplified, but no less significant to my daughter and me, and still filled with osechi classics that we love.  I bring out the special over-sized ozoni soup bowls, and jubako that I have, and we will pick out new and special chopsticks to use during our celebration. I have been saving some from our last trip to Japan for just this occasion.

    I have decided we will do our end of the year shopping on December 29th. What will we find or not? That, of course, is the big question. I know food shipments from Japan have been delayed a lot due to COVID. So, although we will have a big shopping list for December 31st-January 3rd meals, we will make adjustments if needed, and go early and follow best COVID practices. I am pondering which nabemono to enjoy as well over the holidays as it is fun to cook at the table. So many choices!

    On December 31st, I will prepare Tokyo-style Toshikoshi Soba. She adores this Hokkaido-style Ozoni with salmon, so I think we will enjoy this one on January 1st. Of course, fresh mochi will be enjoyed in many different guises, as well as lots of green tea, including our beloved matcha, and every year I add in something different or new for her to try. I love salads, and this is one of my favorites for the New Year.

    For more than a decade, many Japanese have bought Osechi in department stores.  Time has passed and things have changed a lot. Recently Osechi from Japanese restaurants and Sushi shops have also become popular.  Even Chinese restaurants and French restaurants prepare Osechi to be ordered in advance.  Theirs are not like a traditional Japanese Osechi, but people find them tasty and different. Most likely the younger generation who live independently and who do not visit their parents during Oshogatsu will not bother to eat Osechi. Which is a pity in my opinion.  Making Osechi isn’t particularly difficult, just takes some planning and time.

    Namasu: Vinegared Foods

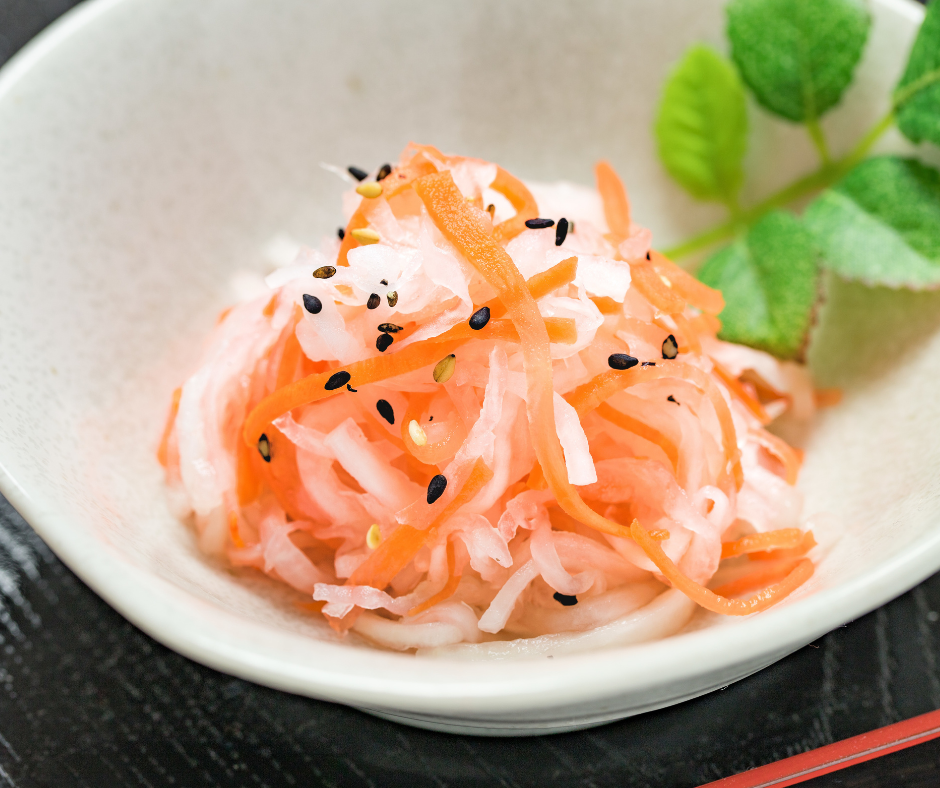
    Namasu is the old term for any type of vinegared food, or Japanese salad. Some are made only with vegetables and others include fish. Kohaku (meaning red and white–typically associated colors of happiness and celebration in Japan) Namasu is a traditional standard for New Year’s (Osechi) celebrations; it combines daikon and carrots. There are really red carrots that sell around the Oshogatsu season.  It is really red, not orange like ordinary carrots. These red ones are strong, so you do not need to put in a lot.

    The red and white color combination is deeply rooted in Japanese culture.  When we see red and white, we recognize it automatically as something auspicious.  Weddings, inauguration ceremonies, the first day of education in schools, or the beginning of a joint venture, town festivals etc., are just some of the many events that red and white are used in celebration. Envelopes with red and white strings to celebrate somebody, too, is often used.

    Kohaku Namasu salad is so easy to make and of course, can be enjoyed year-round if desired.

    Kohaku Namasu Salad

    Lucy Seligman
    No ratings yet
    Course Salad, Side Dish
    Cuisine Japanese
    Servings

    Ingredients
      

    • 1-1/2 cups daikon radish, peeled and cut into matchsticks
    • 1/3 cup carrot, peeled and cut into matchsticks
    • 1 tsp salt

    To make the dressing:

    • 3 tbsp rice vinegar, or to taste
    • 1 tsp white sugar, or to taste
    • salt to taste
    • Dashes of soy sauce and mirin (sweet sake), optional

    Optional Garnishes:

    Instructions
     

    • Combine daikon radish and carrot and knead lightly with salt. Let drain in a colander for 15 minutes. Rinse in water and squeeze out excess water.
    • Combine with dressing and taste for seasoning. If you prefer a sweeter version, cut down on the vinegar and increase the sugar. When ready to serve, drain off most of the dressing. It can be garnished with slivers of fragrant yuzu and or lemon peel, toasted white sesame seeds and served in hollowed out yuzu or lemon halves. This salad actually tastes better after ripening in the refrigerator (in a closed container) for a day or two.
       

    Notes

    The carrot can be replaced with peeled fresh persimmon strips and or dried apricot strips as a variation.
    You can also use yuzu juice (or lemon juice) with vinegar, which gives it a slightly different and refreshing flavor as another variation.
    In Japan, there is Hoshigaki dried persimmon, so you can use dried persimmon strips, too.  However dried persimmon is sweet, so cut down on the sugar when using.
     
    Tried this recipe?Let us know how it was!


    Happy New Year! あけましておめでとうございます。


    Snap a pic and hashtag it #thanksforthemeal — I would love to see a photo of your Kohaku Namasu salad on Instagram and or Facebook, or leave a note in the comments section (see below) and let me know!

  • Oden: Japanese Hodgepodge Stew

    Oden: Japanese Hodgepodge Stew

    oden japanese stewWhen I was a college student in Tokyo, I would often pass mobile food stalls, called yatai, late on blustery winter nights and be completely overwhelmed by the powerful aroma of oden, or Japanese hodgepodge stew. Oden’s pungent smell and taste have made it a perennial favorite with drinkers, no matter the season.  It is definitely a comfort food in Japan and can be enjoyed anytime by everyone.

    The oden is derived from dengaku–grilled, skewered tofu topped with miso. The dish got its start in the late Edo era (1603-1867) when the people of old Edo (now Tokyo) began cooking many ingredients stuck on bamboo skewers in one pot. They used soy sauce as a base, which accounts for the murky darkness of the stock and the uniformly brownish color of the ingredients. Called Kanto-daki (Kanto-style oden), this dish was passed down to the Kansai area. There the people of Osaka changed the stock, taking out the soy sauce and substituting salt and kelp, or sometimes chicken stock or  even white soy sauce, to create a clearer, more delicate broth. The variation, known as Kansai-daki, reached Tokyo and influenced the original oden. In fact, traditional soy sauce-based oden has become a rarity, even in Tokyo.

    My version of Kanto-style Oden is slightly unorthodox, as it includes a relatively small amount of processed fish paste products. You are welcome to add as much as you like. The secret to making a great oden? Time (it definitely improves with age), a variety of ingredients, and the all-important condiment, karashi, spicy Japanese mustard. This Kanto-style recipe is just one of the collection of regional dishes featured on Thanks for the Meal.

    oden japanese stew

    Kanto-Style Oden

    Lucy Seligman
    No ratings yet
    Course Main Course
    Cuisine Japanese
    Servings persons

    Ingredients
      

    • 24 ounces (685 grams) daikon radish, unpeeled, cut into 1-inch (2-1/2 cm) rounds, simmered over low heat in water for one hour
    • 5-1/4 ounces (150 grams) fresh shiitake mushrooms, washed, stemmed, and placed on bamboo skewers (three per skewer)
    • 1-1/4 lb. (600 grams) white potato, peeled, and cut in half, simmered in water for 30 minutes and drained

    To make Fukuro (stuffed, deep-fried tofu):

    • 5 large pieces abura-age (deep-fried tofu), dipped in boiling water for 2 minutes to get rid of excess oil, squeezed to remove excess water, cut in half, then opened to create little sacks
    • 3-1/2 ounces (100 grams) mochi (pounded rice cakes, cut into 3/4 ounce (approx. 20g) slices
    • 8 ounces (225 grams) shirataki (devil’s tongue noodles), cut in half, parboiled, and drained
    • 3 raw eggs
    • 10 8-inch (20cm) long kampyo (dried gourd strips), washed and drained, to tie up the sacks
    • 8 ounces (225 grams) konnyaku (devil’s tongue jelly) cut into triangles, parboiled, and drained
    • 2 chikuwa (fish paste rolls) cut on the bias into thick slices
    • 1 cake tofu, drained and cut into 8 thick squares
    • 4-6 chicken drumsticks
    • Assorted cut-up fish paste products such as kamaboko and satsuma-age, optional

    Dashi Fish Stock:

    • 1 ounce (30 grams) konbu (kelp) wiped with a damp cloth and lightly slashed
    • 8 cups water to soak the kelp in for 30 minutes; retain the water
    • 2 small packets (1/5 ounce or 6g) katsuobushi (dried bonito shavings)

    Prepared Dashi Stock:

    • 2 tbsps sake
    • 1/4 cup light soy sauce or to taste
    • 2 tbsps mirin (sweet sake) or to taste
    • 2 tsps salt or to taste

    Condiment:

    • spicy Japanese mustard (karashi) to taste

    Instructions
     

    • Place the kelp and water into a soup pot over medium heat. Just before it boils, take out the kelp (which can be cut up and added to the oden) and add the bonito shavings. Boil for a minute or two, then strain. Return the stock to a clean soup pot. Add the remaining stock ingredients, adding salt little by little until the flavor is to your liking. Keep the pot simmering.
    • To make fukuro, carefully stuff each pocket with either shirataki, pounded rice cake, or a shelled raw egg. Tie each pocket up with a dried gourd strip.
    • To make oden, place all the ingredients into the simmering prepared stock and cook for at least one hour. Bring the pot to the table and serve communally. Place a selection of the cooked ingredients in shallow bowls, serving the fiery mustard separately. If refrigerated, oden will be even tastier the second day. Reheat, adding more ingredients if desired, and serve.
    Tried this recipe?Let us know how it was!

     Photo © Pelican

    My recipes may include affiliate links, so without costing you anything extra, I’ll earn a small percentage of the sales if you purchase these items through these links. Thank you for your support!

    Leave a note in the comments section (see below) if you make this dish!

    oden Japanese Hodgepodge Stew

    Get FREE Japanese Recipes by Email! Sign Up Now!

    Japanese salad dressing recipes
    .
  • Delicious Tenpura Recipe (Tempura)

    Tempura recipeWith a light, crispy, oil-free coating enveloping a perfectly cooked and succulent piece of seafood or vegetable, tenpura (also written tempura) is considered a quintessentially Japanese food. Both the word and the dish, however, are almost certainly of foreign origin. The source: Spanish and Portuguese missionaries called nanbanjin (southern barbarians) who came to Japan to convert the heathen masses toward the close of the sixteenth century. Prohibited from consuming meat on Fridays, they substituted batter-fried fish.

    There are several theories on where the name came from. Templo, meaning temple or church in Spanish, and tempero, which in Portuguese means cooking, are two possible roots. The Chinese characters can also be read as follows: ten meaning up, pu for flour, and ra for thin silk, the latter most likely a reference to the thin coating of batter.

    By the middle of the Edo era (1603-1867), tenpura, inexpensive and considered relatively low-class, was a popular offering at open-air food stalls. Only in recent years has the dish risen in both price and public esteem to its exalted culinary status in high-class establishments. With a little preparation and practice, it is surprisingly easy to make equally good tenpura at home. Keep the oil at a constant temperature; use ice-cold water to make the batter; and, perhaps most important of all, leave the batter lumpy.

    Tempura recipe

    Tenpura

    Lucy Seligman
    No ratings yet
    Course Main Course
    Cuisine Japanese
    Servings

    Ingredients
      

    • 8 medium or 4 large shrimp washed, shelled, and deveined, with tails slightly trimmed
    • 4 small kisu Japanese whiting fillets (or other small white-fleshed fish), washed and with tails left intact
    • 4 fresh shiitake mushrooms trimmed
    • 4 thick rounds of sweet potato peeled
    • 4 shiso perilla leaves, washed and patted dry
    • 2 Japanese eggplants trimmed and halved lengthwise, with skin lightly scored for quicker frying
    • 4 string beans trimmed and halved lengthwise
    • Sesame oil and vegetable oil for deep-frying half and half is best
    • Dipping Sauce:
    • 1 cup dashi fish stock
    • ¼ cup low-sodium soy sauce
    • ¼ cup mirin sweet sake
    • ¼ cup sake
    • Dash of salt
    • 1 cup daikon radish peeled, grated, and drained
    • 4 teaspoons fresh ginger peeled & grated
    • Lemon wedges & coarse salt optional
    • Batter: Double quantity if necessary
    • 1 large egg
    • 1 cup ice water
    • 1 cup all-purpose white flour sifted

    Instructions
     

    • Prepare the shrimp and other items as instructed above, then place them on a large plate. Bring the dipping sauce ingredients to a boil in a pan, stirring well; remove from heat and pour into four small serving bowls. Let cool. Put the daikon radish, ginger, and lemon (if used) in separate bowls. Prepare a rack for draining the tenpura, and line your serving plates with paper napkins.
    • While you are heating the oil in a wok or other large large, deep-sided pot, lightly mix the egg and ice water in a bowl. Add the flour all at once, stirring only briefly with chopsticks or a fork to create a lumpy, nonsticky batter. Place the bowl of batter in a large bowl filled with ice water near the stove. When a dab of batter is dropped into the oil and rises to the surface and sizzles, the oil is ready.
    • Fry the fish first. Dip them briefly in the batter and then drop into the oil, use
      cooking chopsticks to turn them rapidly.
    • (To preserve their delicate flavor, the perilla leaves should be dipped on their "back" side only.) Then proceed with the other items. If space permits, fry all similar items together. The tenpura is ready when it turns golden brown and floats. I like to drain tenpura using a cooling rack placed over a cookie sheet for easy clean up.
    • Remove any excess fried batter with a slotted spoon.
    • Tenpura should be served immediately and eaten piping hot. It could also be made at the dining room table by the guests, using fondue pots. Dip into the sauce, add grated radish and ginger as desired, or sprinkle with lemon and dip lightly in salt.
    Tried this recipe?Let us know how it was!

    tenpura recipe

    Get FREE Japanese Recipes by Email! Sign Up Now!

    Japanese salad dressing recipes
    .