Tag: shichimitogarashi

  • Salmon and Vegetable Tonjiru Soup: A modern twist on an old classic

    Salmon and Vegetable Tonjiru Soup: A modern twist on an old classic

    AltSalmon Tonjiru Japanese recipehough the weather has been unusually warm and sunny here in the Bay area for the past few weeks, I was craving Tonjiru (豚汁,とんじる), a classic hearty umami-flavored miso-based soul-satisfying pork soup, usually made in the winter. Ton is defined as pork, and jiru meaning soup. Depending on the region, this can also be called Butajiru (豚汁,ぶたじる).

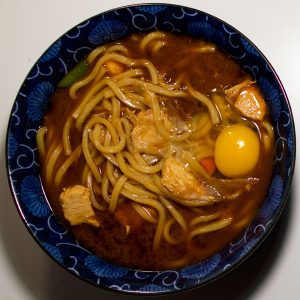
    Although my updated and more modern (or even California) version is so dense with a variety of yummies, that perhaps I should call it a rustic stew? Instead of using the more traditional pork and or pork belly, I replaced it with fresh salmon chunks and added in uncured bacon for an extra layer of flavor and to stay true to the original recipe of Tonjiru. But, you can delete the bacon, although technically it can’t then be called Tonjiru anymore! I even added in kabocha (Japanese pumpkin), a favorite of mine, along with lots of other root vegetables and tofu. You can play around with the ingredients and add in others that you may prefer, such as potatoes. That’s the fun, versatility and flexibility of making Tonjiru. I also used a milder white miso in this dish, which also helped to keep it light, so that it can be enjoyed year-round if you like. This is an easy and quick main course and or substantial soup that is a great addition to your Japanese cooking repertoire.

    I have been asked by many of my Facebook readers recently to post the recipe, so here it is! Be sure to check out the basic miso soup recipe first!


    Get FREE Japanese Recipes by Email! Sign Up Now!

    Japanese salad dressing recipes
    .
    Salmon Tonjiru Japanese recipe

    Salmon and Vegetable Tonjiru Soup

    Lucy Seligman
    No ratings yet
    Course Main Course, Soup
    Cuisine Japanese
    Servings 4

    Ingredients
      

    • 6 cups dashi stock
    • 1 tbsp Japanese sesame oil
    • 3/4 pound salmon fillets*, cut into thick slices, skinned and deboned
    • 1 tbsp grated fresh ginger, or to taste, optional
    • 3 slices uncured bacon*, cut thickly, optional
    • 1-2 tbsps cooking oil
    • 1 white onion, peeled and thinly sliced
    • 1 cup peeled, seeded and cubed Japanese pumpkin (kabocha)
    • 3/4 cup peeled daikon radish, cut into half moon slices
    • 1/2 cup peeled and thinly sliced or shredded gobo (burdock root)
    • 3 satoimo (Japanese taro), peeled and cut into half moon slices
    • 1 carrot, peeled and cut into thick circles
    • 1/2 block konnyaku (konjac), cut in half and thinly sliced
    • 5-6 tbsps white miso**, to taste
    • shiitake mushrooms, stemmed and thinly sliced, optional
    • 1 block firm tofu, drained and cut into medium-sized cubes

    Garnish

    • 1/4 cup minced green onions
    • Shichimitogarashi (7 spice pepper) optional

    Instructions
     

    • Prep all of your ingredients. The goal is to cut all of your ingredients into uniform and similar sizes.
    • Make your dashi and set aside.
    • In a deep pot, saute the ginger and bacon (if using) in sesame oil until slightly browned. Remove the bacon from pot, leaving the ginger, and add in oil. Cook onion and other ingredients such as gobo, kabocha, daikon, taro, and carrot until slightly softened. Add in konnyaku, and mushrooms (if using).
    • Pour in hot dashi stock. Add in salmon and bacon, if using. Bring to a high simmer. If needed, skim off any scum from top of the soup. Cook until all the vegetables are tender.
    • Turn off heat and add in miso using a strainer. Taste. You may want to add in more miso at this point. Add in tofu and gently stir to heat up thoroughly. If you need to reheat do so gently but never boil as you will lessen the flavor of the miso.
    • To serve, ladle into deep soup bowls and top with green onions. Pass shichimitogarashi separately. Eat immediately.

    Notes

    • *Replace the salmon with the more traditional thinly sliced pork and or pork belly (use up to 1/2 lb). If doing so, then saute with the ginger. Delete the bacon if doing this version.
    • **Don’t use Kyoto white miso in this dish. It would make it too sweet. Just use plain white miso.
    Tried this recipe?Let us know how it was!
  • Misonikomi Noodles from Nagoya

    Misonikomi Noodles from Nagoya

    Until I lived in Nagoya, I thought I only preferred less salty, lighter-colored misos, on the sweeter side. But the first time I had Misonikomi, another Nagoyan specialty, and tasted the deeply red and pungent hatcho (red) miso, my miso taste preferences widened and expanded. I loved making my kishimen noodle recipe from earlier this month, but this one might be even better!

    While testing this recipe, I was thrilled to find hatcho miso in the Bay area to use. If you are looking for a deeply satisfying, savory, umami-filled hearty noodle dish, Misonikomi is for you! Make sure you not only have chopsticks, but a soup spoon as you will want to spoon and slurp up every drop of the addictively tantalizing, comforting and delicious soup broth.

    If you like this, check out Kishimen Noodles from Nagoya too.


    Get FREE Japanese Recipes by Email! Sign Up Now!

    Japanese salad dressing recipes
    .
    Misonikomi noodle recipe

    Misonikomi Noodles from Nagoya

    Lucy Seligman
    No ratings yet

    Ingredients
      

    • 14 oz. handmade or dried thick udon noodles
    • 5 oz. chicken breast boned, skinned, and cut into small bite-sized pieces
    • 4 slices kamaboko, steamed fishcake optional
    • 3 ½ oz. Japanese leeks roughly chopped
    • 3 ½ oz. carrots cut into rounds
    • 5 cups strong dashi
    • 2-3 tablespoons hatcho miso soybean paste, or a mixture of 70% red miso and 30% brown miso
    • 4 eggs
    • 3 ½ oz. fresh spinach stemmed, washed, and parboiled, with excess water squeezed out

    To garnish:

    • Shichimitogarashi “seven tastes” pepper

    Instructions
     

    • Boil the chicken, kamaboko, leeks, and carrots in the dashi stock until half-way cooked. Remove.
    • Next, add the udon to the stock and boil until it reaches a chewy consistency. Then add the hatcho miso and continue to cook. As soon as the stock returns to the boil, remove the udon and place in four deep soup bowls.
    • Break the eggs into the stock (perhaps in two batches), and poach until half-way done. While the eggs are cooking, distribute the chicken, kamaboko, spinach, and other vegetables over the udon.
    • Place one egg in the center of each serving, and ladle soup over it – the heat of the soup will finish cooking the chicken, vegetables, and egg. Serve shichimi pepper separately.
    Tried this recipe?Let us know how it was!
  • Yakitori: Skewered, Grilled, and Garnished (Part 2)

    Yakitori: Skewered, Grilled, and Garnished (Part 2)

    YakitoriWalk out of almost any train station in Japan in the evening, look for a restaurant with an akachochin (red lantern) outside, and inside you’ll find groups of salaried workers talking, drinking, and consuming countless skewers of yakitori, this country’s version of shish kebab. There is something very seductive about the smell of meat grilling over charcoal, which may help to explain the nation’s enduring love of yakitori.

    The forerunner of yakitori was a variety of small birds, such as quail or sparrow, split open, flattened and grilled. True yakitori, spitted on skewers, appears to have originated in yatai – food stalls – in Tokyo during the Meiji period (1868-1912). At that time chicken was prohibitively expensive, so beef and pork intestines were primarily used. The notion of grilling food caught on during this period, as Japan opened up to Western influences, including cuisine.

    As the price of chicken decreased in Japan, particularly in the Sixties when “broiler” chickens were introduced, it became the most common yakitori ingredient. These days, yakitori usually consists of chicken parts and vegetables skewered on sticks, grilled, and either sprinkled with salt or brushed with a sweetened soy-based sauce.

    Yakitori

    Yakitori

    Lucy Seligman
    No ratings yet
    Servings 4

    Ingredients
      

    • 1-1/2 lbs boned chicken leg or thigh meat, cut into 1-inch pieces
    • 8 washed & halved chicken livers (or chicken gizzards or rolled pieces of skin)
    • 8 small chicken wings (salt grill only)
    • 1 green bell pepper, seeded and cut into 1-inch pieces
    • 1 or 2 large Japanese leeks (naganegi), white part only (or white onions), cut into 1-inch pieces

    Yakitori Sauce:

    • 3/4 cup mirin (sweet rice sake)
    • 2 tbsps rock sugar, or 1 tbsp white sugar
    • 3/4 cup low-sodium soy sauce
    • 1 or 2 roasted or grilled chicken bones, optional

    Garnish:

    • Ground Japanese pepper (sansho)
    • Seven-spice pepper mixture (shichimitogarashi)
    • Lemon wedges for salted skewers

    Instructions
     

    • Put the mirin and sugar in a saucepan and warm, stirring well, over medium heat until the sugar melts. Add the soy sauce and chicken bones (if used), and bring the mixture to a boil. Turn the heat down and simmer, uncovered, for about twenty minutes. The sauce should reduce about 30 percent, and be thick but still pourable. Strain it and cool to room temperature.
      Since the cooking time for each ingredient varies, each should be threaded on separate skewers – 8- or 10-inch bamboo skewers or short steel shish-kebab ones – except for chicken pieces alternated with leeks, a traditional combination. Four pieces per skewer is best.
      Prepare a barbecue, grill, or broiler. For best results, use charcoal. Grill the skewers, unseasoned at first, turning every few minutes until the ingredients start to brown and the juices begin to trickle out. At this point, either salt both sides of each skewer or dip it into the sauce. Grill for a few more minutes, turning occasionally, then remove the salted skewers for immediate consumption; dip the other skewers into the sauce again and grill them twice more, the second time returning them to the fire only briefly. Serve the sauced skewers with garnishes and the salted ones with lemon wedges.
    Tried this recipe?Let us know how it was!

    Photo attribution: Copyright: npdstock / 123RF Stock Photo


    Leave a note in the comments section (see below) if you make this dish!

    Yakitori recipe


    Get FREE Japanese Recipes by Email! Sign Up Now!

    Japanese salad dressing recipes
    .