This recipe uses another traditional ramen ingredient, namely menma (Manchurian wild rice stems), which I love. Along with fishcake (naruto), spinach, lard, and green onion or Japanese leek, the garnishes add a nice touch to the salt flavoring.
Manchurian wild rice stems(menma or shinashiku) to taste
4slicesfishcakenaruto
8leavesparboiled and trimmed spinachcut into thirds
2teaspoonslard
Minced green onion or Japanese leek to taste
Instructions
Heat stock and add the salt and pepper to taste. Place garnishes on top of the cooked noodles in the salt flavored soup. Add ½ teaspoon lard to each serving and serve piping hot.
In Juzo Itami’s definitive movie on ramen, “Tampopo,” a woman fights for her economic survival by learning the art of ramen (Chinese noodles in soup) making. Kitakata, Fukushima Prefecture, the local economy survives due to the largest concentration of ramen shops in Japan. Why? Ramen is a successful Chinese import, made from wheat flour, eggs,…
Mash the garlic, ginger and leek together. Mix together the mirin, soy sauce and sake. Add all the ingredients to a small saucepan and let cook slowly, over low heat, for five minutes. Combine the soy sauce flavoring with hot stock.
Place garnishes on top of the cooked noodles in the soy sauce flavored soup. Add ½ teaspoon lard to each serving and serve piping hot.
Notes
Garnishes:Manchurian wild rice stems, (menma or shinashiku) to taste4 slices fishcake (naruto)8 leaves parboiled and trimmed spinach, cut into thirds2 teaspoons lardMinced green onion or Japanese leek to taste
In Juzo Itami’s definitive movie on ramen, “Tampopo,” a woman fights for her economic survival by learning the art of ramen (Chinese noodles in soup) making. Kitakata, Fukushima Prefecture, the local economy survives due to the largest concentration of ramen shops in Japan. Why? Ramen is a successful Chinese import, made from wheat flour, eggs,…
Mash the onion and garlic together. Melt the lard in a frying pan and add the raiyu. Put in the onion/garlic mixture and sauté for 2 to 3 minutes. In a small bowl, combine the misos, soy sauce and sesame oil. Add to the frying pan and cook over medium heat for 5 to 10 minutes, stirring occasionally, until thickened and bubbly. Set aside to cool. If refrigerated, it will keep for a few days.
When ready to serve, mix Miso flavoring into hot stock and stir to combine (about 2 tablespoons per serving). If refrigerated, it will keep for a few days.
Notes
*Lard may be replaced by oil in all the recipes, but, the flavor will change.
In Juzo Itami’s definitive movie on ramen, “Tampopo,” a woman fights for her economic survival by learning the art of ramen (Chinese noodles in soup) making. Kitakata, Fukushima Prefecture, the local economy survives due to the largest concentration of ramen shops in Japan. Why? Ramen is a successful Chinese import, made from wheat flour, eggs,…
Barbecued Pork (Chashu) is just one of the many traditional garnishes used for Ramen. It is surprisingly easy to make and has a very seductive taste and smells divine! When I make this, there are never any left-overs! Chashu’s origins come from the Chinese Cantonese barbecue pork dish called Char siu.
Cut the pork lengthwise, and lightly slash the meat with a sharp knife. Tie up the two pieces of meat with string to hold their shape while cooking. Crush the leek, garlic and ginger together. A food processor works very well for this. Combine the condiments with the remaining ingredients and mix well. Pour over the pork and marinate in the refrigerator for three hours, using a non-aluminium shallow pan. Turn over the pork occasionally.
Preheat the oven 400F (200C). Grill the pork for about 40 minutes, brushing with the remaining marinade at least twice during the cooking process. Cool slightly, remove the string and slice thinly.
Notes
*Barbecued Pork is just one of the many garnishes used for Ramen.A serving usually consists of three to four slices.**Any left-over pork may be frozen and used another time.
In Juzo Itami’s definitive movie on ramen, “Tampopo,” a woman fights for her economic survival by learning the art of ramen (Chinese noodles in soup) making. Kitakata, Fukushima Prefecture, the local economy survives due to the largest concentration of ramen shops in Japan. Why? Ramen is a successful Chinese import, made from wheat flour, eggs,…
In Juzo Itami’s definitive movie on ramen, “Tampopo,” a woman fights for her economic survival by learning the art of ramen (Chinese noodles in soup) making. Kitakata, Fukushima Prefecture, the local economy survives due to the largest concentration of ramen shops in Japan. Why? Ramen is a successful Chinese import, made from wheat flour, eggs, salt, and kansui, a special mineral water from China. Ramen may have the reputation of being a low-class noodle dish, but ask any Japanese what food they want to eat as a late-night snack. The answer will inevitably be ramen; preferably at a late-night ramen stall or shop.
Below you’ll find all 5 recipes in the “Art of Ramen” series.
Brief History
A messenger from China brought the flour food culture to Japan in the 8th century. That is when the first form of noodles were first seen in Japan. BY the Edo period (1603-1867), there was a noodle boom in Japan. During the period of 1854-1859, there were 3,700 noodle shops in Edo (old Tokyo). In contrast, the population was only a million. The first person to eat a form of ramen in Japan was Mitsukimi Mito (1628-1700), a relative in Shogun during the Edo era.
So Many Types of Ramen…
In the movie, “Tampopo,” the heroine is in search if authentic ramen, not realizing that ramen is one of Japan’s most versatile noodle dishes. These days, anything goes. It is true that there are standard tastes one expects at a ramen shop or stall, or when eating an instant ramen mix. That is only the beginning in terms of a multitude of tastes and variations.
Ramen has three main tastes: soy sauce, salt or miso (fermented soybeans). Ramen has made regional modifications. For example, Sapporo Ramen, one of the most famous, always uses butter as a garnish. It began in 1923, in Hokkaido, at a noodle shop called Takeya Shokudo.
Ramen noodle making is also varied. It can be made in one of three ways. The most traditional method coming from China, employing a special technique is the extending of the dough by hand. Another way (teuchi) is handmade noodles rolled out with a rolling pin and cut with a knife. The most common and popular way is machine cut noodles. The big difference in these methods is the amount of water in the noodles. Handmade noodles tend to be more watery, with a smoother surface. Machine cut noodles are hard with an uneven surface. These noodles absorb more water, so after eating ramen noodles, most of the soup is gone.
Not sure where to get ingredients?
I like NIHON ICHIBAN (a shop for authentic Japanese products run by the same family for 5 generations). This is an affiliate linkso without costing you anything extra, I’ll earn a small percentage of the sales if you purchase items through this link. Thank you for your support!
Creativity with Ramen
One of the most interesting phenomena in recent ramen history, as ramen has become a mainstream noodle dish, filtering through society, is the development of some very strange ramen variations and combinations. Here are only a few of the more outrageous.
Jigoku (Hell) Ramen: Hot, spicy red ramen
Nori (Seaweed) Ramen: Massive sheets of seaweed cover the top and sides of the ramen bowl
Ogon (Edible Gold Leaf) Ramen
Chocolate Noodle Ramen
Coffee Ramen (coffee replaces the kansui in the noodles)
In a coffee shop in Hakata, Fukuoka Prefecture, ramen noodles made from such diverse ingredients as spinach, carrots, perilla leaves (shiso no ha), oolong tea, or coffee are used. Colorful garnishes include lettuce, tomatoes, cherries, egg and naruto (pink and white spiralled fishcake). The Kanto-style soy-sauce based soup is used with the coffee noodles. The hot soup and coffee flavor create a very distinctive taste. The Kyushu influence is seen by the use of oil floating on top.
Tomato (called red eggplant in China) Yumen, reflects the enduring Chinese influence on ramen noodles. Half boiled tomatoes are crushed using chopsticks, then eaten with noodle in a pork-based soup that has special fragrance, due to the use of celery leaves. First developed by a chef at the Taiwanese Consulate in Tokyo.
Tenshinmen, another ramen noodle dish, uses immense crab legs from Hokkaido, mushrooms, Japanese leeks, and a very thin omelette with green peas covering the top.
Instant ramen
Instant ramen first appeared in 1958. World-wide consumption of instant ramen tops 8 billion servings a year. There are numerous regional instant ramen variations in Japan. Curiously, only in Nagoya has regional instant ramen been unsuccessful, because of their famous and unbeatable udon dish, misonikomi.
For the home cook, with a little help from using prepared noodles, it is very easy to make your special style of ramen noodles. We include a variety of soups and garnishes to excite your palate. You take it from there.
Get FREE Japanese Recipes by Email! Sign Up Now!
Get Lucy’s ebook, “How to Make Traditional Japanese Salad Dressings” FREE when you subscribe.
Thank you!
You have successfully joined our subscriber list.
Ramen History in Japan
** The evolution of ramen as a dish and its many different names throughout history reflect the changing Japanese image and attitudes toward China, and increasing popularity of Chinese food. By 1872, the year of the Friendship Treaty between China and Japan, there were over 1100 Chinese living in Yokohama’s Chinatown (called Nanking-machi.) Within ten years, this number would triple. Then, authentic Chinese restaurants were too expensive for most Japanese. After the Sino-Japanese War (1894-95), all that would change. More Chinese exchange students came to Japan, and smaller, one dish specialty restaurants (like noodle shops) begin in Nanking-machi. **The name changed from Nakingsoba to shinasoba (used in Nanking-machi from about 1912), then to chukasoba, and, finally, for the past eighty years, ramen.
**Shinasoba wasn’t cheap, but people tried it because it was new. As a comparison, 1.8 liters (a sho) of rice cost 10 sen. The first shinasoba shop was opened in Yokohama by a Chinese. There were no fancy garnishes, just noodles and a pork-based soup with a little soy sauce. Menma (mistakenly thought to be preserved or boiled Chinese bamboo shoots, but were instead Manchurian wild rice stems) were added around 1908, with barbecued pork to satisfy Japanese customers need for little culinary embellishments. It wasn’t until after the great Kanto Earthquake of 1923, that more ornate garnishes were added.
**Kansui (Chinese mineral water) is another essential element to making good ramen noodles. The Japanese have borrowed it from China for years. The se of kansui in Chinese flour products have been used for over a hundred years. A Chinese farmer found that if he used special mineral water, made from water of Kan Lake in Northern China, the noodles were easier to extend by hand, with a more elastic and smoother surface. The Chinese believed it had mystical or magic qualities. The Japanese thought so too, until 1959, when it was found to have similar chemical properties to baking soda. The distinctive yellow color of ramen noodles comes from kansui affecting the natural color of the flour.
**By 1911, the first Chinese noodle shop in Asakusa, Tokyo called Rairaiken opened and used kansui to make handmade, naturally extended ramen noodles. Rairaiken specialized in ramen, wonton and shumai. By 1912 or so, Rairaiken had become so popular, that the noodles were being cut by knifes, and ramen noodles had spread throughout Japan.
**Ramen etiquette is pretty loose; but everyone agrees upon one thing; the noisier the slurping, the more enjoyable the eating experience.
A Guide to Cooking Ramen Noodles
**Raw ramen noodles: 3-1/6 ounces (90g) per person. Cook 1 to 2 minutes.
Precooked ramen noodles: 5 ounces (140g) per person. Cook 2 to 3 minutes.
**Ramen noodles are always cooked in plenty of water, just like spaghetti. But, salt is not added to the water. If water overflows when boiling, add a cup of cold water to stop it.
**Cook until the al dente (still firm) stage. The hot soup will cook the noodles to the appropriate doneness.
**Drain, but don’t rinse the noodles. Divide the portions (cook only 1 to 2 portions at once) and place in deep soup bowls immediately.
**If you plan to cook lots of noodles, keep the water level up.
**Additional Garnished for Ramen: Canned corn, lightly poached or boiled egg, wakame or nori seaweed, kaiware radish sprouts, peeled shrimp, pickled ginger, crab, baby squid, snow peas, kimchi, toasted and crushed sesame seeds-depends only on your imagination!
**Traditional Condiments Always Served With Ramen:
Place on them on the table; to be added to the ramen by each person as desired.
1chicken carcass or 7 ounces chicken wingscleaned**
1Japanese leeknegi, cut in half
1medium-sized onionpeeled and halved
1medium-sized carrotpeeled and halved
1large knob gingerpeeled and halved
3 to 4egg shells***
7-1/2cupswater
Instructions
Place all ingredients in a soup pot. Bring to a boil, lower heat to a high simmer, and cook, covered, for two to three hours, skimming of the scum occasionally. Strain the stock using a cheesecloth-lined colander; pressing down on the remaining ingredients with the back of a large wooden spoon to release all the flavor. If not used immediately, cool and freeze the stock until needed.
Notes
*This recipe can be easily doubled or tripled to yield enough stock for 10 to 15 servings. The stock can be frozen for later use. One serving is 1-1/4 cups.**Cracked pork bones (for a richer stock) and even shelled short-necked clams, quickly sautéed in sesame oil (for a lighter stock) can replace or be mixed with the chicken to create a different tasting stock.***The egg shells help to kill the smell of the carcass and/or bones, and to absorb some of the scum.
Mash the garlic, ginger and leek together. Mix together the mirin, soy sauce and sake. Add all the ingredients to a small saucepan and let cook slowly, over low heat, for five minutes. Combine the soy sauce flavoring with hot stock.
Place garnishes on top of the cooked noodles in the soy sauce flavored soup. Add ½ teaspoon lard to each serving and serve piping hot.
Notes
Garnishes:Manchurian wild rice stems, (menma or shinashiku) to taste4 slices fishcake (naruto)8 leaves parboiled and trimmed spinach, cut into thirds2 teaspoons lardMinced green onion or Japanese leek to taste
Manchurian wild rice stems(menma or shinashiku) to taste
4slicesfishcakenaruto
8leavesparboiled and trimmed spinachcut into thirds
2teaspoonslard
Minced green onion or Japanese leek to taste
Instructions
Heat stock and add the salt and pepper to taste. Place garnishes on top of the cooked noodles in the salt flavored soup. Add ½ teaspoon lard to each serving and serve piping hot.
Cut the pork lengthwise, and lightly slash the meat with a sharp knife. Tie up the two pieces of meat with string to hold their shape while cooking. Crush the leek, garlic and ginger together. A food processor works very well for this. Combine the condiments with the remaining ingredients and mix well. Pour over the pork and marinate in the refrigerator for three hours, using a non-aluminium shallow pan. Turn over the pork occasionally.
Preheat the oven 400F (200C). Grill the pork for about 40 minutes, brushing with the remaining marinade at least twice during the cooking process. Cool slightly, remove the string and slice thinly.
Notes
*Barbecued Pork is just one of the many garnishes used for Ramen.A serving usually consists of three to four slices.**Any left-over pork may be frozen and used another time.
Mash the onion and garlic together. Melt the lard in a frying pan and add the raiyu. Put in the onion/garlic mixture and sauté for 2 to 3 minutes. In a small bowl, combine the misos, soy sauce and sesame oil. Add to the frying pan and cook over medium heat for 5 to 10 minutes, stirring occasionally, until thickened and bubbly. Set aside to cool. If refrigerated, it will keep for a few days.
When ready to serve, mix Miso flavoring into hot stock and stir to combine (about 2 tablespoons per serving). If refrigerated, it will keep for a few days.
Notes
*Lard may be replaced by oil in all the recipes, but, the flavor will change.
THIS DISH IS SIMPLE, elegant, and absolutely delicious. In my house, whenever I’m in doubt as to what to serve guests, I make this.
The Eastern ingredients are of course, the ever-versatile soy sauce, which can be used to highlight many different types of sauces. I also use perilla leaves (shiso) as a refreshing garnish. The Western ingredients are the Grand Marnier and butter, used to create the base of the sauce, which is fairly French in construction.
Usually I make this dish with beef, but I’ve found that duck goes equally well. Any firm green vegetable could be substituted for the green beans – sometimes I use okra or the thinner Chinese green beans. I choose elephant garlic for its mildness, but regular garlic goes just as well.
4 to 6elephant garlic clovespeeled and sliced thickly
Unsalted butter
6oz.shiitake mushroomsstems removed and halved
6oz.green beanswashed, ends snapped off, and cut into three inch segments
4boned and skinned duck breastsapprox. 5 oz. each
Salt and pepper to taste
Sauce:
3 to 4tbspunsalted butter
Zest of one large orangecut into slivers or strands
Juice of one-half orange
2tbspor more soy sauce
¼cupplus 2 tbsp Grand Marnieror any orange-based liquor such as Triple Sec or Orange Curacao
Garnish:
Fresh perilla leavesshiso, cut into slivers (may replace with watercress sprigs)
Instructions
Sauté garlic slices in 1 or 2 tsp of butter until lightly browned. Set aside, covering to keep warm. Do the same with the shiitake mushrooms. Parboil green beans in lightly salted water. Drain. Lightly sauté in one to two teaspoons of butter. Set aside as well, keeping warm. If desired, you may season each vegetable with salt and pepper. You may also, as an alternative, steam the mushrooms and green beans instead of sautéing them.
Sauté duck breasts in one tablespoon of butter over medium heat. Cook until desired doneness (in this recipe, duck should still be pink inside). Set aside, keeping warm.
To make sauce: Add two tablespoons of butter to the remaining duck drippings and turn heat back to medium. Add orange zest, orange juice, soy sauce, and Grand Marnier. Cook for a few minutes until sauce is reduced, stirring continually. To thicken sauce just before serving, add a tablespoon or two of cold butter and stir until thoroughly combined.
SERVING SUGGESTION: Place garlic, shiitake mushrooms, and green beans along edges of plate, in a half circle. Place duck in the center. Lightly spoon sauce over duck. Top duck with a small mound of perilla leaves. Serve immediately.
VARIATION: Duck can be replaced with beef, such as a filet mignon. This dish is also good served with potatoes, such as potatoes Anna, a traditional French preparation.
My recipes may include affiliate links, so without costing you anything extra, I’ll earn a small percentage of the sales if you purchase these items through these links. Thank you for your support!
Leave a note in the comments section (see below) if you make this dish!
Get FREE Japanese Recipes by Email! Sign Up Now!
Get Lucy’s ebook, “How to Make Traditional Japanese Salad Dressings” FREE when you subscribe.
Beef sukiyaki is the perfect recipe to have in winter. It’s a one pot dish that’s cooked and served at the table, making the clean up easier for busy cooks. It’s also a fun way to engage the family and guests together in the cooking process.
Origins of Sukiyaki
Nobody really seems to know the origins of beef sukiyaki. One theory is that in the old days farmers slipped a little flesh into the vegetarian diet imposed by Buddhist strictures by grilling (yaki) meat on a plowshare (suki). In 1873, Emperor Meiji declared that beef was acceptable for consumption, and from that time on it became part of the Japanese diet, although traditional dishes have always used relatively small quantities of meat.
Sukiyaki, called gyunabe during the Meiji era (1868-1912), is beef and vegetables lightly simmered in a sweetened sauce, served with a raw egg as dipping sauce. It’s a warming, filling dish, perfect for winter.
As with many Japanese dishes, the method of making sukiyaki differs from area to area. Kanto (Tokyo area) sukiyaki is made by simmering the beef and vegetables in a prepared sauce, whereas in this version, from Kansai (Kyoto-Osaka area), you make the sauce in the pot as you cook.
One point to remember is that the beef should never be overcooked – it’s best eaten still pink. That’s how gyunabe was served in the good old days.
All you really need with sukiyaki is a bowl of rice, some Japanese pickles, and green tea and fresh fruit to finish off. Sukiyaki can be very filling, as everyone tends to eat a lot of meat, so plan to have enough meat on hand.
My recipes may include affiliate links, so without costing you anything extra, I’ll earn a small percentage of the sales if you purchase these items through these links. Thank you for your support!
Leave a note and rating in the comments section (see below) if you make this dish!
a chunk of beef suet,about 1 oz. (often included with sukiyaki –cut beef)
7oz.negi (Japanese leek),cut diagonally into 1 – inch slices
6oz.fresh shiitake mushrooms,with stems removed and a crisscross incision made on the cap to speed up cooking
½lb.chrysanthemum leaves, cut into 2–inch pieces
A bunch of mitsubatrefoil or seri (Japanese Parsley), cut in half
Slivers of fresh burdock root, optional
1 ½cakes of grilled tofu,cut into 1–inch cubes
½lb.shirataki (noodles made from konnyaku, devil’s tongue),parboiled for 2–minutes, drained, and cut in half
A small package of wheat gluten, optionalprepared according to instructions on package
4– 8 eggs
Sauce:
½ – ¾cuplow–sodium soy sauce
¼ – ½cupwhite sugar
¼ – ½cupsake
¼ – ½cupmirin (sweet rice wine)
Instructions
This dish is cooked at the table, so have all the ingredients ready.
Melt the suet in a sukiyaki pan if you have one (if not, use a cast–iron pan, wok, or frying pan). Add all the vegetables, tofu, shirataki, and wheat gluten if you are using it. Then add a little of each of the sauce ingredients to suit your own taste. The sauce should cover the bottom of the pan but not be excessive. Top with strips of beef and cook briefly, covered, over high to medium heat. After a few minutes remove the lid. As soon as the beef begins to change color, it is ready to eat.
Break an egg per person into individual bowls; each person mixes his egg and uses it as a dipping sauce. The beef should be eaten first, then by the time you get to the vegetables they will be cooked. As you take beef and vegetables from the pan, add more meat, vegetables, and sauce, and continue cooking. If you prefer to make the sauce a bit sweeter, add more sugar and mirin to taste. For a less salty version, add a little water.
What the Japanese originally called kashi first came to Japan from China during the Nara period (710-93) in the form of fresh or dried fruit. Although not our modern idea of what a sweet should be, fruit was still referred to as kashi right up until the Muromachi period (1333-1573). Later, sweets made of rice flour or wheat flour and steamed or fried in oil—the forerunners of modern-day Japanese confections—were eaten as a snack between the two daily meals most Japanese nobles consumed in ancient times.
The main sweetener employed in these confections was a syrup extracted from amazura, a tree-like vine. Although a primitive form of unrefined sugar appeared in Japan during the Nara period, it was almost exclusively employed as a cure-all by the aristocracy during the Nara and Heian (794-1185) periods; sugar didn’t come into general use as a sweetener in Japanese confections until the Muromachi period.
Traditionally Japanese confections are called wagashi. There are three main types; namagashi (raw confections), nerigashi (semi-raw confections), and higashi (dried confections). Most of these sweets were developed as a complement to the tea ceremony. Seasonally based, the two common denominators in many of these treats are a lot of sugar, which is used as a preservative, and the use of a red bean paste, called an, traditionally made from adzuki beans.
Need books?
I’m buying mine from Abe Books now in an effort to support smaller businesses. They have new and used options and harder to find books, including all of my favorite Japanese cookbooks!You can support Thanks for the Meal by clicking on this banner to buy your books.
Arigatou Gozaimasu / ありがとうございますいます –Lucy
One of the most popular semi-raw confections is yokan—sweet red bean paste jelly. Yokan has an intriguing history. During the Nara and Heian periods, the term yokan referred to lamb stew (yo meaning “lamb” and kan meaning “soup” or “stew”), a savory banquet delicacy for the upper classes. There was also a type of sweet rice cake from China called yokan mocha, shaped and colored red like lamb liver, that was apparently developed so Buddhist priests, who were ostensibly vegetarians, could vicariously sample the lamb dish. One of the few sweets made using sugar during this time, yokan mocha was considered quite exotic. Teikin orai, a book written anonymously in the early Muromachi period, tells of 48 differently shaped types of yokan, all steamed.
In the Kansei era (1789-1800), an unsteamed version called neri-yokan was developed that used agar-agar as the setting agent. Since then, many variations of yokan have appeared, using chestnuts, sesame seeds, different types of beans in place of adzuki, and so on. Mizu-yokan, so delicate and soft it is eaten with a spoon, is the summer variation.
Get FREE Japanese Recipes by Email! Sign Up Now!
Get Lucy’s ebook, “How to Make Traditional Japanese Salad Dressings” FREE when you subscribe.
Soak the agar-agar in cold water for one hour. Squeeze out excess water and tear into small pieces. Place the agar-agar in a saucepan along with two cups of water and bring to a slow boil. Stir with a wooden spoon until the agar-agar completely dissolves. Skim off any scum that rises to the surface. Place the red bean paste in a bowl and slowly add the strained agar-agar liquid. Mix until fully combined. Return the mixture to a clean saucepan and cook over low heat for five minutes. Add sugar to taste and the salt. Remove from heat and add remaining ¾ cup of water. Stir well. Cool down to lukewarm by placing the saucepan in a larger bowl of ice water. Continue stirring to lessen lumps.
When the mixture is lukewarm, slowly pour it into a square baking pan (9-inch or 23 cm). If there are any bubbles on the surface, price them with a toothpick. Cover with plastic wrap. Place in the refrigerator until fully set and chilled.
To serve, run a wet knife around the edges of the pan and cut into squares. Mizu-yokan is best eaten with dessert spoons.
Notes
*Agar-agar is gelatin made from seaweed. Used in many Japanese sweets, it is available at Asian markets and health food stores.
THERE IS NOTHING MORE RESTORATIVE in summer than a slurp of cold somen, Japan’s thinnest noodle, made from wheat. As a hot dish, somen is known as nyumen; cold, it’s called hiya-somen or hiya-mugi, and is traditionally eaten from early July to mid-August.
The word “somen” is derived from the Chinese sakumen, meaning “cable noodles” – most forms of noodles came to Japan from China. Somen are traditionally made the Chinese way, by pulling the dough rather than cutting it.
Little is known of the origins of somen in Japan. In the Nara era (710-93), wheat was already being grown in Miwa, Nara Prefecture; the people of Miwa made a dough of wheat flour and salt water similar to somen dough, but we don’t know whether somen was made.
The first written mention of somen appears in Engikishi, a tenth-century record of royal ceremonies. By 1205, it was being eaten in Kyoto by monks who had travelled in China. It didn’t become widely popular, however, until the Edo period (1603-1867), as wheat was initially reserved for nobles and priests.
Somen is best made in winter, dried slowly, and eaten after the June-July rainy season. Unlike rice, it improves with age and can be kept for a year or so in a dry, cool place. These days, most somen is machine-made, but Miwa hand-made somen is still available, and said to be the tastiest in Japan.
1 ½small unwaxed cucumberssemi-peeled and cut diagonally into thin slices
1 ½medium tomatoespeeled and cut into thick slices
A bunch of kaiwareradish sprouts, stemmed and cut in half
Seasonal fruits such as peachescherries, or apples, peeled and cut into slices
Instructions
Cook the somen according to instructions on the package. Drain immediately and wash with your hands in cold water to cool completely and get rid of starch. Keep in cold water until ready to eat.
Make the dipping sauce by combining the dashi stock, soy sauce, sake, and mirin in a small saucepan over a low heat. Taste and adjust seasonings: for a saltier sauce, add more soy sauce, for a sweeter one, more mirin. Chill before using; if made in advance, refrigerate until ready to use.
To serve, place cubed ice in a large glass bowl or individual ones. Drain the somen and place it on the ice. Arrange the garnishes on top. Pour the dipping sauce into four small glass bowls and arrange mounds of condiments on a large dish or several small ones so that guests can mix whichever condiments they like into their sauce and use it as a dip for mouthfuls of somen, vegetables, and fruit
Notes
Condiments:1 ½ – 2 tablespoons fresh ginger, peeled and grated3-4 tablespoons green onions, rinsed in cold water, patted dry, and minced4 perilla leaves, cut into slivers (optional)1-2 tablespoons sesame seeds (optional)Myoga, a Japanese ginger (optional)
My recipes may include affiliate links, so without costing you anything extra, I’ll earn a small percentage of the sales if you purchase these items through these links. Thank you for your support!
Leave a note in the comments section (see below) if you make this dish!
Get FREE Japanese Recipes by Email! Sign Up Now!
Get Lucy’s ebook, “How to Make Traditional Japanese Salad Dressings” FREE when you subscribe.
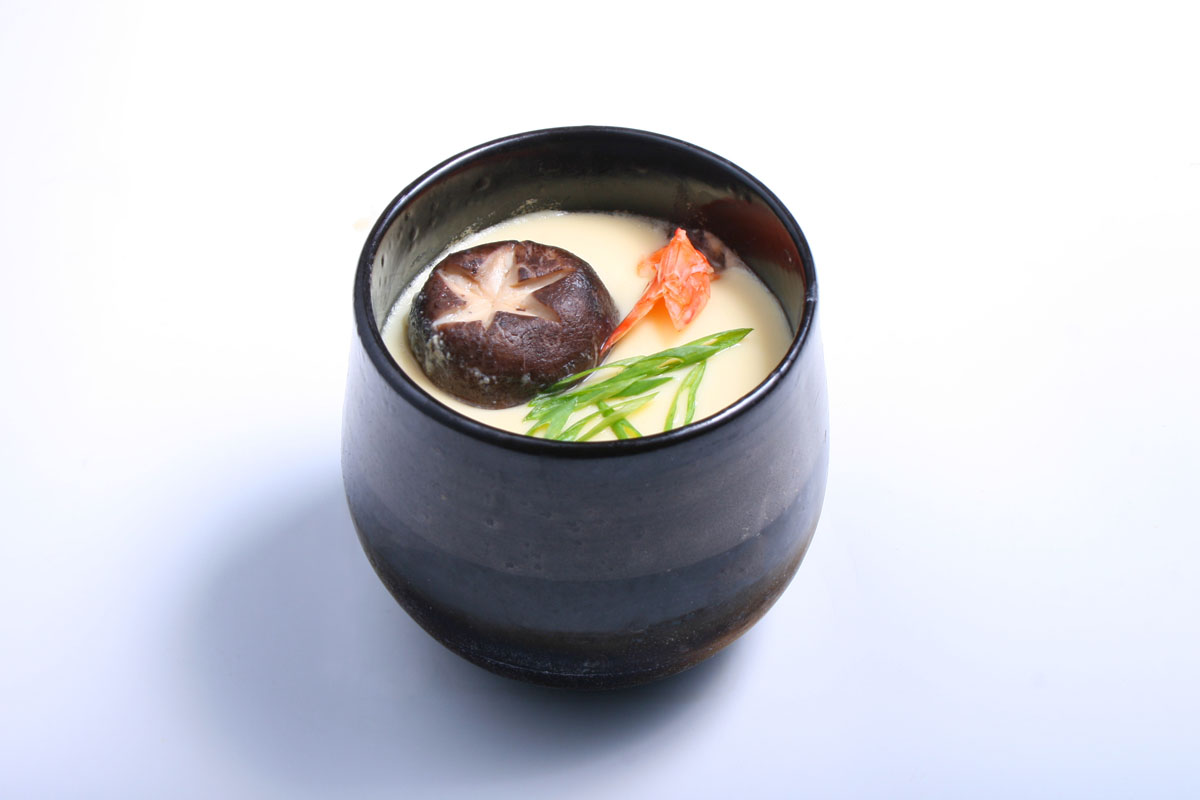
Until I began my love affair with Japanese food, at the age of fifteen, I wasn’t very thrilled to be served custard of any form or flavor. For me, the word “custard” conjured up a vile, sickeningly sweet concoction that was best consigned to the garbage. But chawan-mushi, Japan’s delectable savory version, expanded my horizon—at least regarding custard.
It’s hard to categorize chawan-mushi: it can be classified as a soup, or a custard, or both. Although the egg mixture forms a custard, there is a noticeable amount of the soup in it as well. Delicious eaten hot, it is equally good as a chilled summer dish. For a slightly sweeter version, increase the amount of mirin (sweet sake). With a little imagination, numerous other variations can be created—in season, for instance, I would replace the shiitake mushroom with a sinful and expensive slice of matsutake, Japan’s premier and delicious mushroom.
The hardest part of making chawan-mushi is the cooking time; it will take a little practice to get it right. It’s not only a matter of steaming until the custard sets, but the steaming time also depends on the type of container used and the amount of bubbles in your custard. As far as possible, eliminate those bubbles so that your custard is smooth and silky.
8uncooked gingko nutsshelled and peeled or 2 uncooked chestnuts, shelled, peeled, and halved
2fresh shiitake mushroomshalved
8fresh green peasparboiled, or 4 snow peas, strings removed, parboiled and halved
4thin slices kamabokosteamed fishcake
Instructions
Cut the chicken into eight pieces and marinate for 15 minutes in the sake and 1 tablespoon of soy sauce. Drain.
Beat the eggs and add the dashi, remaining soy sauce, mirin, and salt. Strain through cheesecloth or a fine sieve. Try to avoid making bubbles.
Distribute marinated chicken, shrimp, ginkgo nuts, mushrooms, peas, and fishcake among four custard cups. Pour the strained egg-dashi mixture over it until the custard cups are almost full. If there are any bubbles, prick them with a toothpick.
Preheat a steamer. Cover the cups with plastic wrap and steam for 15-20 minutes over medium heat. Check doneness by sticking a toothpick through the center; if egg sticks to the toothpick, continue steaming for a few more minutes. The top of the custard should be smooth and jiggle slightly if touched.
When cooked, remove the plastic wrap and place chopped trefoil or spinach in the center. Top with a few slivers of yuzu or lemon peel.
*Japan’s basic fish stock made from dried bonito shavings, kelp, or a combination of the two.
Notes
To garnish: 3 tablespoons chopped fresh mitsuba (trefoil) or parboiled spinach leaves A few slivers of yuzu (Japanese citron) or lemon peel
My recipes may include affiliate links, so without costing you anything extra, I’ll earn a small percentage of the sales if you purchase these items through these links. Thank you for your support!
Leave a note in the comments section (see below) if you make this dish!
Get FREE Japanese Recipes by Email! Sign Up Now!
Get Lucy’s ebook, “How to Make Traditional Japanese Salad Dressings” FREE when you subscribe.


 THIS DISH IS SIMPLE, elegant, and absolutely delicious. In my house, whenever I’m in doubt as to what to serve guests, I make this.


 THERE IS NOTHING MORE RESTORATIVE in summer than a slurp of cold somen, Japan’s thinnest noodle, made from wheat. As a hot dish, somen is known as nyumen; cold, it’s called hiya-somen or hiya-mugi, and is traditionally eaten from early July to mid-August.